


Inside Kubernetes: What Really Happens When You Run kubectl?
kubectl in Action: A Deep Dive into Kubernetes’ Hidden Pathways

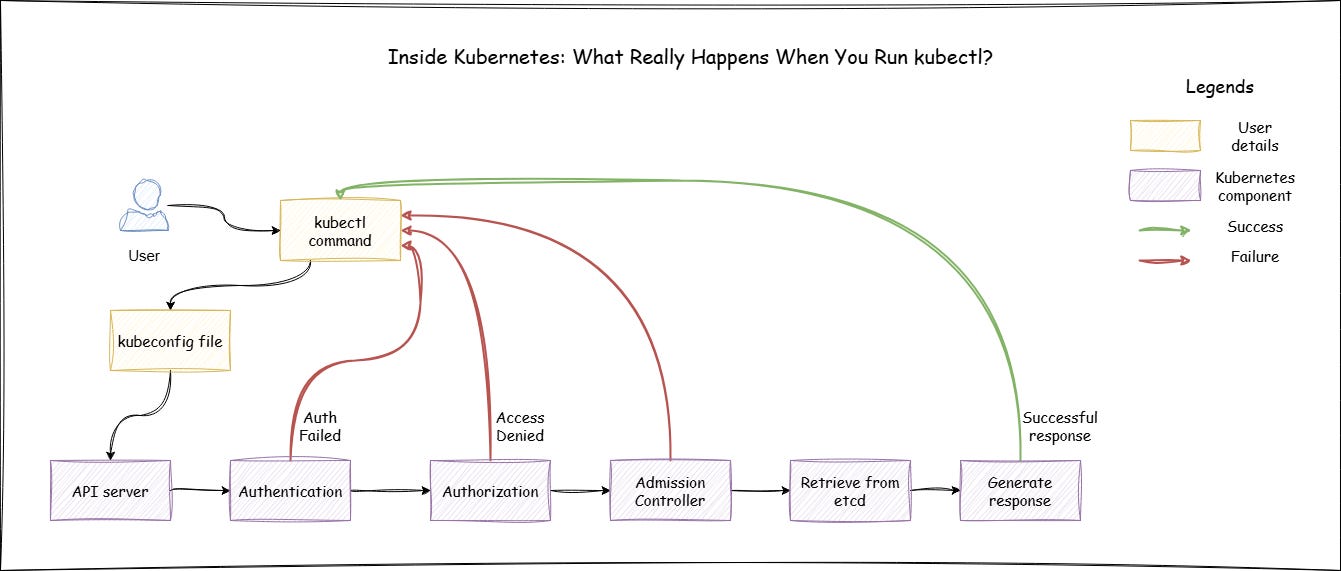
Picture this: You’re at your desk, ready to check the health of your Kubernetes cluster. You type kubectl get nodes, expecting a quick response. It feels simple. But beneath that quick response from Kubernetes is a labyrinth of processes, checks, and handshakes. Have you ever wondered what actually happens behind the scenes to deliver that output? Let’s break it down — not just the commands and responses, but the entire journey.
Before the actual request, kubectl needs to know two critical things: who you are and which cluster to talk to. This information is stored in your Kubeconfig file, usually located at ~/.kube/config.
A typical Kubeconfig contains multiple clusters, users, and contexts:
apiVersion: v1
kind: Config
clusters:
- name: production-cluster
  cluster:
    server: https://192.168.1.100:6443
    certificate-authority: /path/to/ca.crt
users:
- name: dev-user
  user:
    client-certificate: /path/to/client.crt
    client-key: /path/to/client.key
contexts:
- name: dev-context
  context:
    cluster: production-cluster
    user: dev-user
current-context: dev-context
In this case, kubectl reads from the current context (dev-context) to identify the cluster endpoint and authenticate as dev-user.
Along with reading of kubeconfig file, kubectl get nodes becomes a GET request to the Kubernetes API Server. The API path looks like this:
GET /api/v1/nodesThe request is sent over HTTPS to the API server using the cluster endpoint specified in kubeconfig.
Now lets dig into the the request flow.
Step 1: Authentication — Who Are You?
Once the request is formed, it’s sent to the Kubernetes API Server (kube-apiserver). The first thing it asks is: Who is this?
Kubernetes supports several authentication methods, including:
Certificates: If using client certificates, kube-apiserver checks the validity of the certificate (
client.crt) using its trusted CA.Bearer Tokens: Often used by service accounts.
OIDC: If you’re using cloud-managed clusters, external identity providers like AWS Cognito or Azure AD authenticate you.
Example: Using a client certificate for authentication.
kubectl get nodes --kubeconfig ~/.kube/configkube-apiserver checks the cert details like:
Is the certificate signed by a trusted CA?
Has it expired?
Does the Common Name (CN) match the expected username?
If authentication passes, the request moves on. Otherwise it will throw error as 401 Unauthorized, which looks like this
Unauthorized: authentication failed for user "dev-user" Since the identity is not established, authorization is never checked.
Step 2: Authorization — Can You Do This?
Next comes authorization. Kubernetes uses Role-Based Access Control (RBAC) to decide whether you have permission to perform the requested action.
A Role defines a set of permissions (e.g., read, write, delete) for specific Kubernetes resources within a namespace while a RoleBinding grants a user, group, or service account the permissions defined in a Role.
A simple role example to allow a user to get nodes:
kind: Role
apiVersion: rbac.authorization.k8s.io/v1
metadata:
  namespace: default
  name: node-reader
rules:
- apiGroups: [""]
  resources: ["nodes"]
  verbs: ["get", "list"]
A corresponding RoleBinding links this role to the user:
kind: RoleBinding
apiVersion: rbac.authorization.k8s.io/v1
metadata:
  namespace: default
  name: node-reader-binding
subjects:
- kind: User
  name: dev-user
  apiGroup: rbac.authorization.k8s.io
roleRef:
  kind: Role
  name: node-reader
  apiGroup: rbac.authorization.k8s.io
kube-apiserver evaluates this binding. If dev-user has the correct permissions, the request moves forward.
If the authorization check fails, it returns with error 403 Forbidden. Where error looks something like this :
Error from server (Forbidden): nodes is forbidden: User "dev-user" cannot list resource "nodes" in API group ""The request does not proceed further.
Step 3: Admission Controllers — Do You Meet the Policies?
Even if authorization is granted, there’s one more checkpoint. Admission controllers enforce policies to ensure the request complies with organizational rules.
For example:
Pod Security Policies (PSP) ensure containers run with appropriate permissions.
ResourceQuotas prevent exceeding resource limits.
Mutating Webhooks may inject necessary sidecars or add environment variables.
Say, you add an annotation to a pod for monitoring (monitoring=true), an admission controller could automatically inject a sidecar container for metrics collection.
Note that Admission controllers only apply to mutating or validating requests that create, update, or delete resources (like kubectl create or kubectl apply).
Since kubectl get nodes is a read-only GET request, it skips the admission controller phase.
Step 4: Execution and Response
Once all checks pass, kube-apiserver forwards the request to the etcd for reading or writing data. In this case, it fetches the list of nodes from etcd.
The API server then generates a JSON response and sends it back to kubectl.
A sample response looks like this :
{
  "kind": "NodeList",
  "apiVersion": "v1",
  "items": [
    {
      "metadata": {
        "name": "node-1"
      },
      "status": {
        "capacity": {
          "cpu": "4",
          "memory": "8Gi"
        }
      }
    }
  ]
}
Depending on your preferred output format (-o json, -o yaml, -o wide), kubectl processes the response and displays it.
Example Response:

The Final Word
From a simple kubectl get nodes, Kubernetes has gone through multiple phases: authentication, authorization, admission control, data retrieval, and response. It’s a sophisticated dance that ensures security, compliance, and reliability.
Next time you hit enter on a kubectl command, you’ll know the magic that happens behind the curtain.